PRP (Platelet Rich Plasma) has been used for decades to help people recover from injury. Nowadays, it’s best known for its use in aesthetic skin rejuvenation and non-surgical hair restoration.
Its preparation is relatively easy, although there are different ways to go about it, depending on your equipment and goals. Some of the most common questions regarding PRP relate to its preparation and more specifically, its centrifugation.
The fact is, there is no standardised method for preparing PRP. The availability of many different centrifuge machines, PRP tubes and preparation protocols makes it hard to ascertain exactly what needs to be done in order to correctly make PRP and generate an optimal number of platelets per yield.
This guide is intended to help those who may be wondering where to start with preparing PRP for centrifugation. In this article, we’ll show you how to leverage information provided by scientific studies in order to inform your own PRP preparation process.
The most basic of tools needed are the regular consumables and disposables required for the collection of blood and the maintenance of aseptic techniques. At a minimum, this includes gloves, alcohol swabs, a butterfly needle, a vacutainer and a tourniquet.
If you plan on injecting PRP, you may need to keep a number of smaller 1-2.5ml syringes and mesotherapy needles to hand (multi-pin crystal needles are recommended for hair restoration procedures). For microneedling with PRP, you will need a mechanical device alongside single-use needle cartridges. Alternatively, CIT roller devices and mechanical mesotherapy injectors with multi-pin needles can also be used to administer PRP.
If you plan to use PRP tubes without ingredient additives, you may wish to use syringe connectors to mix your PRP with hyaluronic acid or other sterile active ingredients after it has been prepared. This can be done to further enhance treatment results.
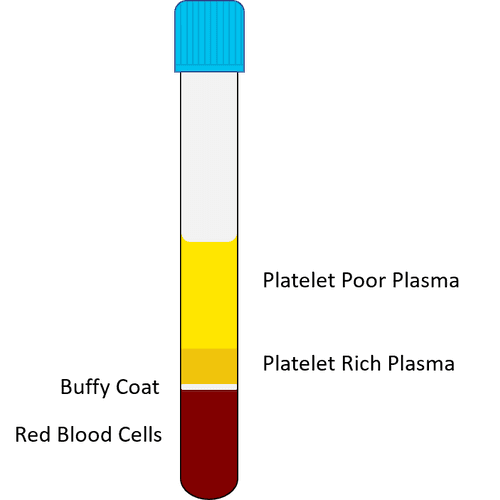
You’ll need a test tube rack to hold your tubes of collected blood and later, plasma. Using a rack reduces the likelihood of accidental breakage and keeps your treatment space organised. When tubes are aligned vertically, it’s also easier to evaluate the level of PRP relative to PPP (Platelet Poor Plasma) before drawing up the plasma.
You’ll also need an even number of anticoagulant PRP tubes for collecting blood. If you use a single tube or any other uneven number of tubes, balance tubes are required. Before placing these in a centrifuge, they must be pre-filled with enough water to equate the exact blood volume of each tube you wish to offset. Ultimately, all tubes must equate to an even number and be placed directly opposite one another in the centrifuge in order to maintain a balanced load.
There are many kinds of PRP tubes available, many of different volumes as well as with different types of anticoagulants.
Tubes with the anticoagulant ACD (acid citrate dextrose) are most often recommended over EDTA tubes. Tubes with separator gel are also highly recommended, as they isolate the platelets from white and red blood cells and make the extraction of PRP easier, without any significant risk of contamination.
Modern PRP tubes often contain additives such as hyaluronic acid (for skin rejuvenation) and biotin (for the stimulation of hair growth). Using PRP tubes with additives can supercharge treatment results.
If desired, PRP can be activated after the centrifugation process is complete. Studies have indicated that activating PRP increases growth factor release and leads to better outcomes, particularly in hair loss treatments. This process involves adding a 10% concentration of calcium chloride to the final yield. The common belief amongst those in the medical and scientific community is that around 0.02-0.025ml of activator per 1ml of PRP should be added.
Before drawing blood, the top of each tube must be wiped with a 70% isopropyl alcohol swab. Should the top of the tube be handled before final extraction has taken place, this process should be repeated. Also, the site of needle insertion should be adequately sanitised before blood is collected from the individual undertaking the PRP treatment.
Once blood has been collected, lightly turn each PRP tube from side to side around seven times in order to mix the blood with the tube’s anticoagulant.
PRP tubes should be centrifuged within six minutes of blood collection and the PRP itself should be administered within the following four hours.
The best type of centrifuge for PRP is a powerful one with a 45° fixed angle rotor. It should be able to accommodate a relatively significant number of tubes; at least 6 x 10ml is ideal. Some models are much smaller in size and are not designed with clinical use in mind.
Before purchasing a centrifuge, consider the size of the PRP tubes you intend to use. The most commonly-available size is 10ml; 15ml and 20ml tubes are also readily available. Your machine must be configured with appropriately-sized holders; otherwise, your tubes won’t fit into the centrifuge.
A professional-grade centrifuge is a powerful asset for those who perform many PRP treatments. Some even come with a built-in refrigerating mechanism to prevent the premature activation of platelets on account of the machine’s thermal energy. However, these so-called industrial models are typically very expensive and can take up a lot of space.
Nowadays, many countertop PRP centrifuges offer high speed and convenience; most are able to accommodate up to 60mls or more of collected blood, which is more than enough for a single aesthetic or hair-related PRP treatment.
A successful PRP preparation contains a large number of platelets. When spinning blood in a centrifuge, the resulting concentration of platelets is heavily influenced by two factors:
Most countertop PRP centrifuge machines require users to set the time duration as well as an RPM value, which stands for ‘revolutions per minute’.
At this point, it’s useful to understand what RPM actually means. Firstly, it should never be confused with RCM.
The RCM value is the rate of acceleration at which the centrifuge’s rotor revolves. However, the actual force that’s exerted onto the blood-containing PRP tubes has to be based on the radius of the user’s own machine rotor – and this is defined by RPM.
It is this RPM value – along with the time duration – that you will need to know in order to configure your machine correctly before centrifuging your PRP tubes. The RPM value must be calculated; read on to find out how this is done.
If you plan on performing a second spin, larger syringes (typically 5 or 10ml) are useful for the extraction of plasma from the original PRP tubes used for blood collection and the first spin. A long spinal needle of 20-25g of at least a 5cm or more length is useful for extracting PRP and PPP from centrifuged tubes; a standard 1-1 ½” drawing needle cannot extend far into the tube.
Finally, sterile empty tubes without anti-coagulant must be used to accommodate the plasma extracted from the first spin. These will be placed in the centrifuge for a second spin, after which the PRP (and sometimes, PPP) are removed from these tubes and drawn up into smaller syringes for injection or deposition onto the treatment site as ‘gliding’ serum (microneedling procedures).
All of these materials, except for the test tube rack and centrifuge, are disposable and must be discarded after use.
The most common and simplified “double spin” process is outlined as follows:
– Collected blood is centrifuged at a lower speed;
– Once complete, the plasma is extracted and inserted into empty sterile tubes;
– These tubes are then placed inside the centrifuge and spun for a second time, typically at a higher speed than that applied to the first;
– The tubes are then removed from the centrifuge and placed in a test tube rack. Concentrated platelet-rich plasma is found in the lower third of each tube. The upper two thirds contain PPP, or platelet poor plasma:
– Using a syringe and an attached spinal needle, the needle is inserted through the top of the tube and the tube’s PPP portion is removed from the tube. This PPP can now be discarded, or kept for microneedling or topical application;
– After this, the remaining contents of the tube – PRP – are gently shaken from side to side, in order to mix the PRP with the tube’s platelet pellets;
– Thereafter, PRP is carefully extracted using a spinal needle attached to smaller syringes. It is then prepared for injection or other forms of administration.
Increasingly, scientific research points to the benefits of a ‘double spin’; a two-part centrifuge process that involves a ‘soft’ spin (to separate red blood cells from plasma) and, after this, a ‘hard’ spin (to separate platelets from plasma and increase overall platelet concentration). A double spin method typically results in a larger number of platelets and growth factors than otherwise generated by single spin.
For the sake of our example, we will assume that the radius of our rotor from its axis to its edge is 5cm (50mm) and that our PRP tubes each contain a total of 10ml blood volume.
We will follow the most universally recommended time duration protocol of 10 minutes per spin. For the first spin, studies recommend a G-Force/RCM of between 230-270G.
In our example, we will apply the minimum G Force/RCFs outlined by Keeci et. al for the soft and hard spins. This study involved the use of 9ml tubes, which are close in volume to standard 10ml PRP tubes, and was based on the following parameters:
– An initial PRP centrifugation of at least 250g for 10 min (soft spin)
– A final PRP centrifugation of least 300g for 10 min (hard spin)

However, based on the study’s results, we would likely calculate a G-Force/RPM of at least 500g or more to make it a ‘harder’ spin and, as per the study’s findings, yield more platelets as a result:
“At the second spin, centrifugation force was varied from 300×g, 500×g, 750×g, 1000×g, 1500×g and 2000×g for 10 min. The platelet concentration factor increased as the centrifugal force of the second spin increased”*
Now we have our calculations, we would just need to apply the following settings to our “double spin” centrifuge process:
– 10 min x 2115 (first spin)
– 10 min x 2317 (second spin)
By taking G-Force/RCM values and selecting a protocol that uses similar PRP tubes (of the same or similar volume of blood), you can utilise information from previous scientific studies and apply the same framework to your own PRP preparation process.
In order to calculate your RPM values, therefore, you will need to do the following:
The optimal G-Force/RCM value is usually higher for PRP preparations that contain more blood volume. Therefore, if you intend to use 15ml or 20ml PRP tubes, you may wish to base your RPM calculations on a study that uses these types of tubes, as opposed to those conducted with lower volume PRP tubes (<10ml).
If you wish to undertake a single spin instead of a double spin, your G Force/RCM will need to be higher. Again, you can source information from previous studies to calculate your RPM. However, it is not recommended to use an overly high RPM value, as this may result in shattered and/or non-viable PRP tubes.
It’s important to acknowledge that there is no ‘one size fits all’. No matter the situation, different PRP centrifugation machines require different RPMs.
It’s not recommended to simply use any RPM, even if it’s provided by a reputable machine or PRP tube manufacturer. The RPM is dependent on the size of your own centrifuge’s rotor, so if your machine is different, you must calculate it yourself in advance of spinning your PRP tubes.
It’s not advisable to base your RPM on advice given by others who are using different equipment. However, if you have purchased a centrifuge and PRP tubes from a company who have pre-calculated RPMs based on their equipment, then it is advisable to stick to their guidelines.
For those who have purchased their own centrifuge and tubes independently, it’s necessary to calculate the RPM for this specific setup. Although it’s not an exact science, this method is more likely to yield a high number of platelets and result in a greater degree of treatment satisfaction.
Regardless of everything, studies regarding optimal PRP protocols continue to be published and the debate within academic circles continues. Therefore, whatever you decide to do, it is always best to base your PRP preparation on the best available protocols for the most satisfying treatment results!